Thursday 15 December 2011

Our Christmas Decorations this Year

Its been a busy time, lots of tests and hospital visits, I'm afraid my brain tumor has come back, we are just waiting to see the neurosurgeon on how to proceed. This post is also to let everyone know as well, relations and friends who I know drop by, hopefully I will get some treatment soon.
So I did feel a bit let down and not sleeping, so I really haven't felt up to much, but I thought as I've designed all these decorations I should jolly well use them, and I love to papercraft. This year we kept it simple, pastel baubles I rooted out for the tree, and a few of my paper hangers, a paper wreath, and a few paperchains, and lots of pressies under the tree hopefully, Prince has one from Bella already!!, and he knows its His. Linda :)x


Tuesday 22 November 2011

Envelope Gift Wallets Step by Step


Just in Artwolf on Etsy. Envelopes with Slip Cards and tags.
1a.. Print off your digital download on to light to medium weight white card. 1b.. Roughly cut out your pieces from the main sheet, so they are all separated. 2.. You can now carefully trim your envelope and message slip card, using scissors or if you prefer you can use a guilloteen on most of the straight sides. 3a.. The top side of the slip card has a centre marker to help you position your hole punching 3b.. Leave this attached till after you have punched the hole. 3c.. Then cut off. 4..Trim all the curved edges, first cut into the centre line of corners.
5.. Then cut from each side into the centre cut line. Large scissors are great for cutting straight lines, smaller for details and curved scissors
for round and curved shapes.
6.. When all trimmed and cut out, as indicated on the template, score the centre envelope line and the tab lines, and firmly crease both the tabs. 7a ,7b ... Fold into place.The envelope is now ready to Glue. 7c.. Cut out round tags with curved scissors.

8a.. Glueing; First place a blob of glue with your finger onto the area indicated with the arrow in the picture, on one side, where the two fold in tabs overlap. Firmly press together. 8b.. Spread glue onto the two folded in tabs, being very careful not to allow any glue to overlap into the inside edges, which would stick the inside of the envelope together. Carefully fold over the flap and pressing firmly together, minor adjusting can be made, before its completely fixed together. Sticky Fingers glue is super for paper crafting. 9.. Choose your ribbons. 10.. You could also place a paper sticker across the message card to hold a cash gift. 11&12.. Thes are very pretty decorated with glitter or other embellishments. Pictures and text on scoring and glitter decoration can be seen in previous step by steps, here on this Blog. :)

Monday 14 November 2011

Christmas Heart Decorations

New Christmas Heart Decorations that may be found as a Digital download via Artwolf on Etsy.
A quick Step by Step Picture run through.
They can be used as tags, or backed to each other with a ribbon loop in between the two as decorations hanging from tree, alternatively on a descending straight vertical ribbon hanger, or horizontal banner hung, or sandwich two together on a
kebab stick with ribbon bow beneath to decorate plants etc.

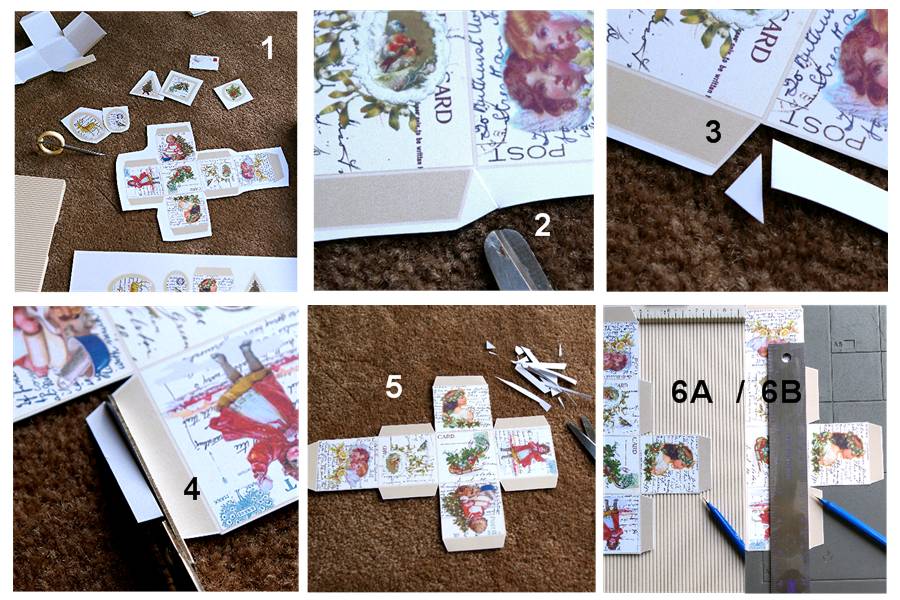
1..Print off your digital sheet onto card, smooth bright white card for the best effect.
Fit to page will cover all page sizes, and is the simplest option, but if you are computer literate you can take them up larger to your pages size limits.
2..Cut out the hearts just roughly, leaving some white surround to release them into individual pieces, they are easier to cut out now. 3.. If you don't want to make up the boxes or all the tags now, leaving a border of white surround around each piece will save the piece's edges in pristine condition, so you can safely store them in a box, until you wish to make them up.
4..Make a centre cut into the mid line of the hearts white excess, before cutting away the excess to the centre, this will stop you cutting too far into your heart's centre edge.
5..Then continue to cut away the white excess from the circumference of the rest of your heart shape.
6 & 7.. I lay out the cut shapes using the carpet (because I haven't a table at Present :),) as my mood board as a trial, laying different colours of ribbons and textures together, till I get an effect or marriage of textures I wish to continue with.
8..Gluing together hearts. I use catalogues or old magazines as my gluing board, turning the page for a clean surface between operations
Dab glue all over one back surface of a heart, spread over with fingers, flip magazine page and lay down on a nice new surface, Wiping fingers before proceeding. You can now either lay in a ribbon loop, kebab stick, or ribbon banner
depending on what you are making.
Now cover the glued side with another heart, arranging and pressing carefully together.
9.. Place a blob of glue on your magazine page and gently cover the outside edges with glue, applying with a fingertip(easiest) all the way around the heart shape.
10.. Glitter, Tear a clean page from your magazine fold in half and crease,this will help you pop your glitter back into the container when you have finished.
10B..Pour some glitter of your choice into the folded page
10A..Gently push your glued edge heart into the glitter.
11..Showing two finished Heart Hangers.
12..The double sided heart stick is made in exactly the same way, except that a kebab stick is inserted between the two heart shapes. The kebab stick is laid down on the glued heart, a small amount of glue added to the stick portion to be encased within the heart, before sandwiching gently together. I only stuck a small portion of the stick into the heart's middle line, less than halfway up, to make a secure fixing.
Double backed hearts look best with nice crunchy glitter on the outside edges, which masks any small cutting or gluing errors too, or you can insert stick crepe ruffle to one hearts outside edges, before sticking on the other heart, which gives a really pretty vintage effect, (depending how much patience you have, and of course if you have the time, and if you are enjoying it).
12.. A simple tied satin ribbon completes the Heart Stick.
Some other ideas, Below.
Click on pictures to view in a larger format.

Friday 21 October 2011

Making up a Christmas Vintage Box and Tags

New Christmas box Template and tags to be found on Artwolf on Etsy.
Just a quick zip through in pictures to take out the mistique of making boxes.
These boxes will fit together perfectly, just follow the very detailed instructions and diagrams on the Tips and Text sheet you get along with your digital template.

1. Print off your digital sheet onto card, smooth bright white card for the best effect. Cut out the box template and tags just roughly, leaving some white surround to release them into individual pieces, they are easier to cut out now. If you don't want to make up the boxes or all the tags now, leaving a border of white surround around each piece will save the piece's edges in pristine condition, so you can safely store them in a box, until you wish to make them up.
2. Make a centre cut into all of the corner spaces on the template before cutting into the corners, as in 3, this will stop you cutting too far into your box,when you cut away the rest of the whiteexcess from and into those corner spaces.

4. Cut out the rest of your box,from the white surrounding card,
as you can see completed in, 5.

6. Score lines indicated in your Diagrams, Tips and Text, sheet you received with your template, either using a board 6A or a 6B a ruler,with a scoring tool, carefully position and lightly crease score lines. Completed scored and creased box,7. Folding the box up together 8. Added glue to the box's side tabs and gluing, back two first, then front,9. The best Glue for this is Sticky Fingers, Crafters Glue.

Cutting the tags out 10, any rounded tag cutting is greatly helped if you have apair of curved bladed small scissors, not neeeded, but so much easier, you can usually pick up a cheap pair at the chemists counter. You can cut out tags with guilloteen, for straight sided ones or scissors, or try fancy edge scissors for some variety,11. Punching holes for ribbon when finished.12.

Decorating can carried out on a flat box or after glueing together, I prefer to glue together first before adding glitter etc. Ribbons should be the last editions.

The boxes and tags I completed while I photographed, have not yet been decorated with any extra embellishments or glitter as I still do not have full access to my craft supplies.

But I'm sure you get the idea.


Sunday 16 October 2011

Toby in Autumn Light


After a long day with his rug off, Mark took some pictures of Toby just as the sun went down, before we popped his rug back on. Hes starting to grow in his own winter coat, definately looking fluffier. My attempt at getting the ears forward with the empty feed bucket failed, still Toby still trailed after me around the field waiting for his apple treats.

Wednesday 12 October 2011

Christmas Vintage Postal Cards


Little Girls grow up, but we all love to believe in Santa Claus and Christmas,
Postcards digital sheet to be found in Artwolf on Etsy.

Tuesday 11 October 2011

Autumn Treats for Christmas-Sloe Gin


A special request a repost of how to make SLOE GIN

You Still have time to collect the last sloes and make some wonderful warming liqeure drink in time for Christmas, and its really simple.
Don't be put off if you dont like the taste of plain gin, sloe gin tastes nothing like it.
First pick some sloes, fruit of the blackthorn bush, Picking late, in October means the sloes will reach their maximum ripeness - and flavour.
Sloes picked late rarely need pricking with a pin this is usually done to the early collected ones August,early September which are very hard and will produce a drier tasting sloe gin, which I did this year so after decanting I had to add another two desert spoons of sugar to the gin mix.
You will need.....
1 lb or 2lb of Sloes, depending on how much you want to make.
Granulated sugar
Gin
Funnel
Empty Bottles
Gather and wash your sloes remove any stems,leaves, and badly squashed fruit.
Turn out on an old clean towel or similiar to dry, (sloe juice will stain clothing).
1. Fill your bottle with sloes to half way up the main body of the bottle.
2. Pop a funnel in the neck of the bottle, and pour in enough sugar to come to the top of the sloes level.
3. Fill the bottle to the top with Gin.
4. Screw on the Lid
5. Give the bottle a shake to get the sugar disolving.
After care...
Recipe 1. Turn the bottle up and back gently a couple of times,just once a day, for a week with the later ripe fruits.
((4 weeks with the early(as they are more resistant))
You can decant now or carry on after turning just once a week for the next few months,Then a week or two before Christmas, Strain your sloe gin through a coffee filter into a clean bottle.))
My Recipe 2. Its just preference, but I have noticed if left that long, there is more pulp and residue to strain as the sloes will break down in the bottle, Clouding, thereby wasting Gin!!! so my choice is to decant after a month of turning just once a day,every day of that month whatever the sloes are like, there is no loss in flavour.
Decanting;
I strain my bottles of sloe gin mix through coffee filters which removes any residue of fruit pulp, and results in a lovely clear Sloe Gin. During the filtering I go through up to about 5 coffee filters in the process. It just takes time, have patience. Pre wet the coffee filters with water before pouring the gin through, (you can use plain white kitchen roll in a sieve, but be careful get the strong kitchen roll) pouring carefully, most of the sloes will stay behind in the bottles, and you can shake them out child's money box style to clear the bottles, once washed you can pour the decanted gin back into the bottles.
You can now taste the decanted Sloe Gin, adding a small amount of sugar to your own taste if necessary, if the gin being too dry for you. Thats it..

Label,Rest on your laurels, Keep or store to Christmas or beyond.Enjoy :)

Thursday 6 October 2011

Christmas Cat themed Postal set


Snowballing kittens and Christmas cats curled up snug, new addition from Artwolf

Sunday 2 October 2011

Cardmakers Halloween Magic and Mystery

MAGIC and MYSTERY, a Hooded lady waits by the stage door, nearly midnight, footsteps echo in the cobbled side alley, a Gunshot or Black powder?
Through the mists the hooded figure silently dissappears.
Hoots of Owls in the Moonlight, while the scent of roses perfumes the cool night air.
Ancient texts and cyphers in the glow of candlelight, all in the pursuit of the prize.


Latest Digital offering from Artwolf found on Etsy

Sunday 25 September 2011

Lounge Nearly There...

We have Carpet,Lights and our Suite of lounge furniture back from upstairs, so I took this little pic as two of the residents are enjoying some of the seating and carpeting and one is about to shave his beard off, Shame....


Tuesday 20 September 2011

Digital Christmas Instant Gratification by EMail

Just a few of The new listings from Artwolf on Etsy

Wednesday 17 August 2011

Reflections, on my Real Persona

Two posts in one day, inspired by changes in the music list, the two I mention, remind me of very different things. Yet they are somehow related in hiding and refelecting a different front to the world. The interview Rob Williams part of madonna (do watch the video)reminds me of myself hiding behind different personality traits. Going from a happy outgoing young child who would stand on a chair and sing to everyone to another just a few years on a very different 7 year old, made to feel self aware of all my supposed short comings and looks. This carried on into the teenage years to the fact that I would be physically sick at the prospect of going out and socialising, its always been there. I married a very well balanced super man who enjoyed life , I remember one evening coming home and trying to explain how I hadn't really enjoyed the evening as much as it appeared ( Life and Soul of the party Persona being Worn to full effect) and of course upsetting him, he really couldn't understand it. So I found its best not to confide,
as you usually upset people who matter, but you all now know and thats the truth of it. I'm very shy, I don't really enjoy partying unless I have the party face firmly grafted on, then sometimes I really do have fun, which is good, that I can shake it off now and again..
The Lola song reminds me of Danny, who was so shocked when I pointed out, what the Lola song he was merrily singing was all about, he still loved to sing it, a favourite song, good one Dan Williams. :)

Woozle, Wednesday's Choice


Woozle died a year ago today

She enabled me to have Fun and compete in a meriade of disciplines,and to a level I would never have aspired to without her.


Gentle spirit but full of fire and bravery.
RIP 17th August 2010


Never Forgotten.

Thursday 11 August 2011

Toby back to Work

Tob'y leg has healed well, so we are giving him some gentle short exercise rides to get his skin used to the saddlery again.


We are fine don't need rescuing TY


wait for me!!

Beautiful Horse and Rider

Please watch this is so lovely , Pause my music sounds the video has beautiful music to accompany it, just one of the videos Susan Williams has shared on Facebook.

Doma Vaquera • Dressage • équitation from Romain NEGRE on Vimeo.


Saturday 6 August 2011

Cardmaking, Altered art for Cat Lovers

I spent a couple of days on and off creating this Cat and Kitten, Digital Sheet for Artwolf on Etsy.
Now I know why it takes me so long to make a card!!.
They incorporate two of my pastel drawings, Angel Feathers, and Peace to All.
Still now you don't have to, use them as they are, distress them, add Satin ribbons use as you will, to fire your creativity.


Its the Cowes Week Red Arrows Display

What a treat on your own doorstep.


Tuesday 2 August 2011

Fairy Digital Vintage Style Postcards

Artwolf has just added these Fae postcards to Etsy, for all cardmaking and papercrafting fun.
Apologies also to everyones blog I usually visit. For some strange reason, I don't seem able to register any comments, just seems to take me around in a loop.
Ahh well, I'm still enjoying all your blogs and work. :) Linda


Sunday 31 July 2011

Digital Horse Sheet For Scrapbooking Cardmaking

Theres a few more Digital downloadables in Artwolf on Etsy, heres one of them to view, Equestrian related in the Vintage Edwardian Postcards Style.
They incorporate two of my pastel drawings Unicorn Blue, and Faith & Hope(Rabbit & Pegasus Foal)

Saturday 30 July 2011

Hickstead Show Jumping

A bevy of Show Jumping Stars were competing for the Prize honors but Germany's Marcus Ehning won the Bunn Leisure Trophy, claiming the £6,500 first prize on board Noltes Kuchengirl.
"She has a lot of experience and I've been riding her for a long time, so I know her well and what she's capable of," Marcus said of the mare.


OSWOA (Original Small Works Art) Awards

OSWOA (Original Small Works Art) Awards

YBA ACEO ART CATEGORY AWARDS

YBA ACEO ART CATEGORY AWARDS